Static vs Dynamic ADAS Calibration: What’s the Difference?
After a windshield replacement, bumper repair, alignment, or collision fix, a vehicle’s safety systems may need recalibration. That’s where static vs dynamic ADAS calibration becomes important. The two methods use different setups, different time requirements, and different costs. Some vehicles need only one type. Others need both in sequence. And if the wrong method is skipped, systems like lane keeping or automatic emergency braking won’t work as expected. This guide breaks down the differences in plain language so car owners can understand what happens, why it matters, and what to ask after service.
For a broader overview first, see the full ADAS calibration guide and this primer on what ADAS calibration is.
What Are the Two Types of ADAS Calibration?
Static ADAS calibration is performed in a controlled shop bay using targets, lasers, and exact measurements. Dynamic ADAS calibration is performed during a road test where the vehicle uses lane lines, road signs, and traffic patterns to self-align sensors. Depending on the vehicle and repair, technicians may perform one or both methods.
These two ADAS calibration types exist because sensor systems are built differently across makes and models. A front camera may require a target board indoors. A radar unit may require a drive cycle outdoors. In many cases, the safest result comes from combining methods, not picking one based only on cost.
Why the distinction matters for safety
ADAS features make split-second decisions. If a camera points a fraction of a degree too high or low, it'll misread lane position or vehicle distance. If radar aim is off, forward collision warnings may trigger too late or not at all. Calibration puts those sensors back into the correct reference position after repairs.
The National Highway Traffic Safety Administration (NHTSA) explains how these systems support crash avoidance and why proper function matters for real roads: Driver Assistance Technologies (NHTSA).
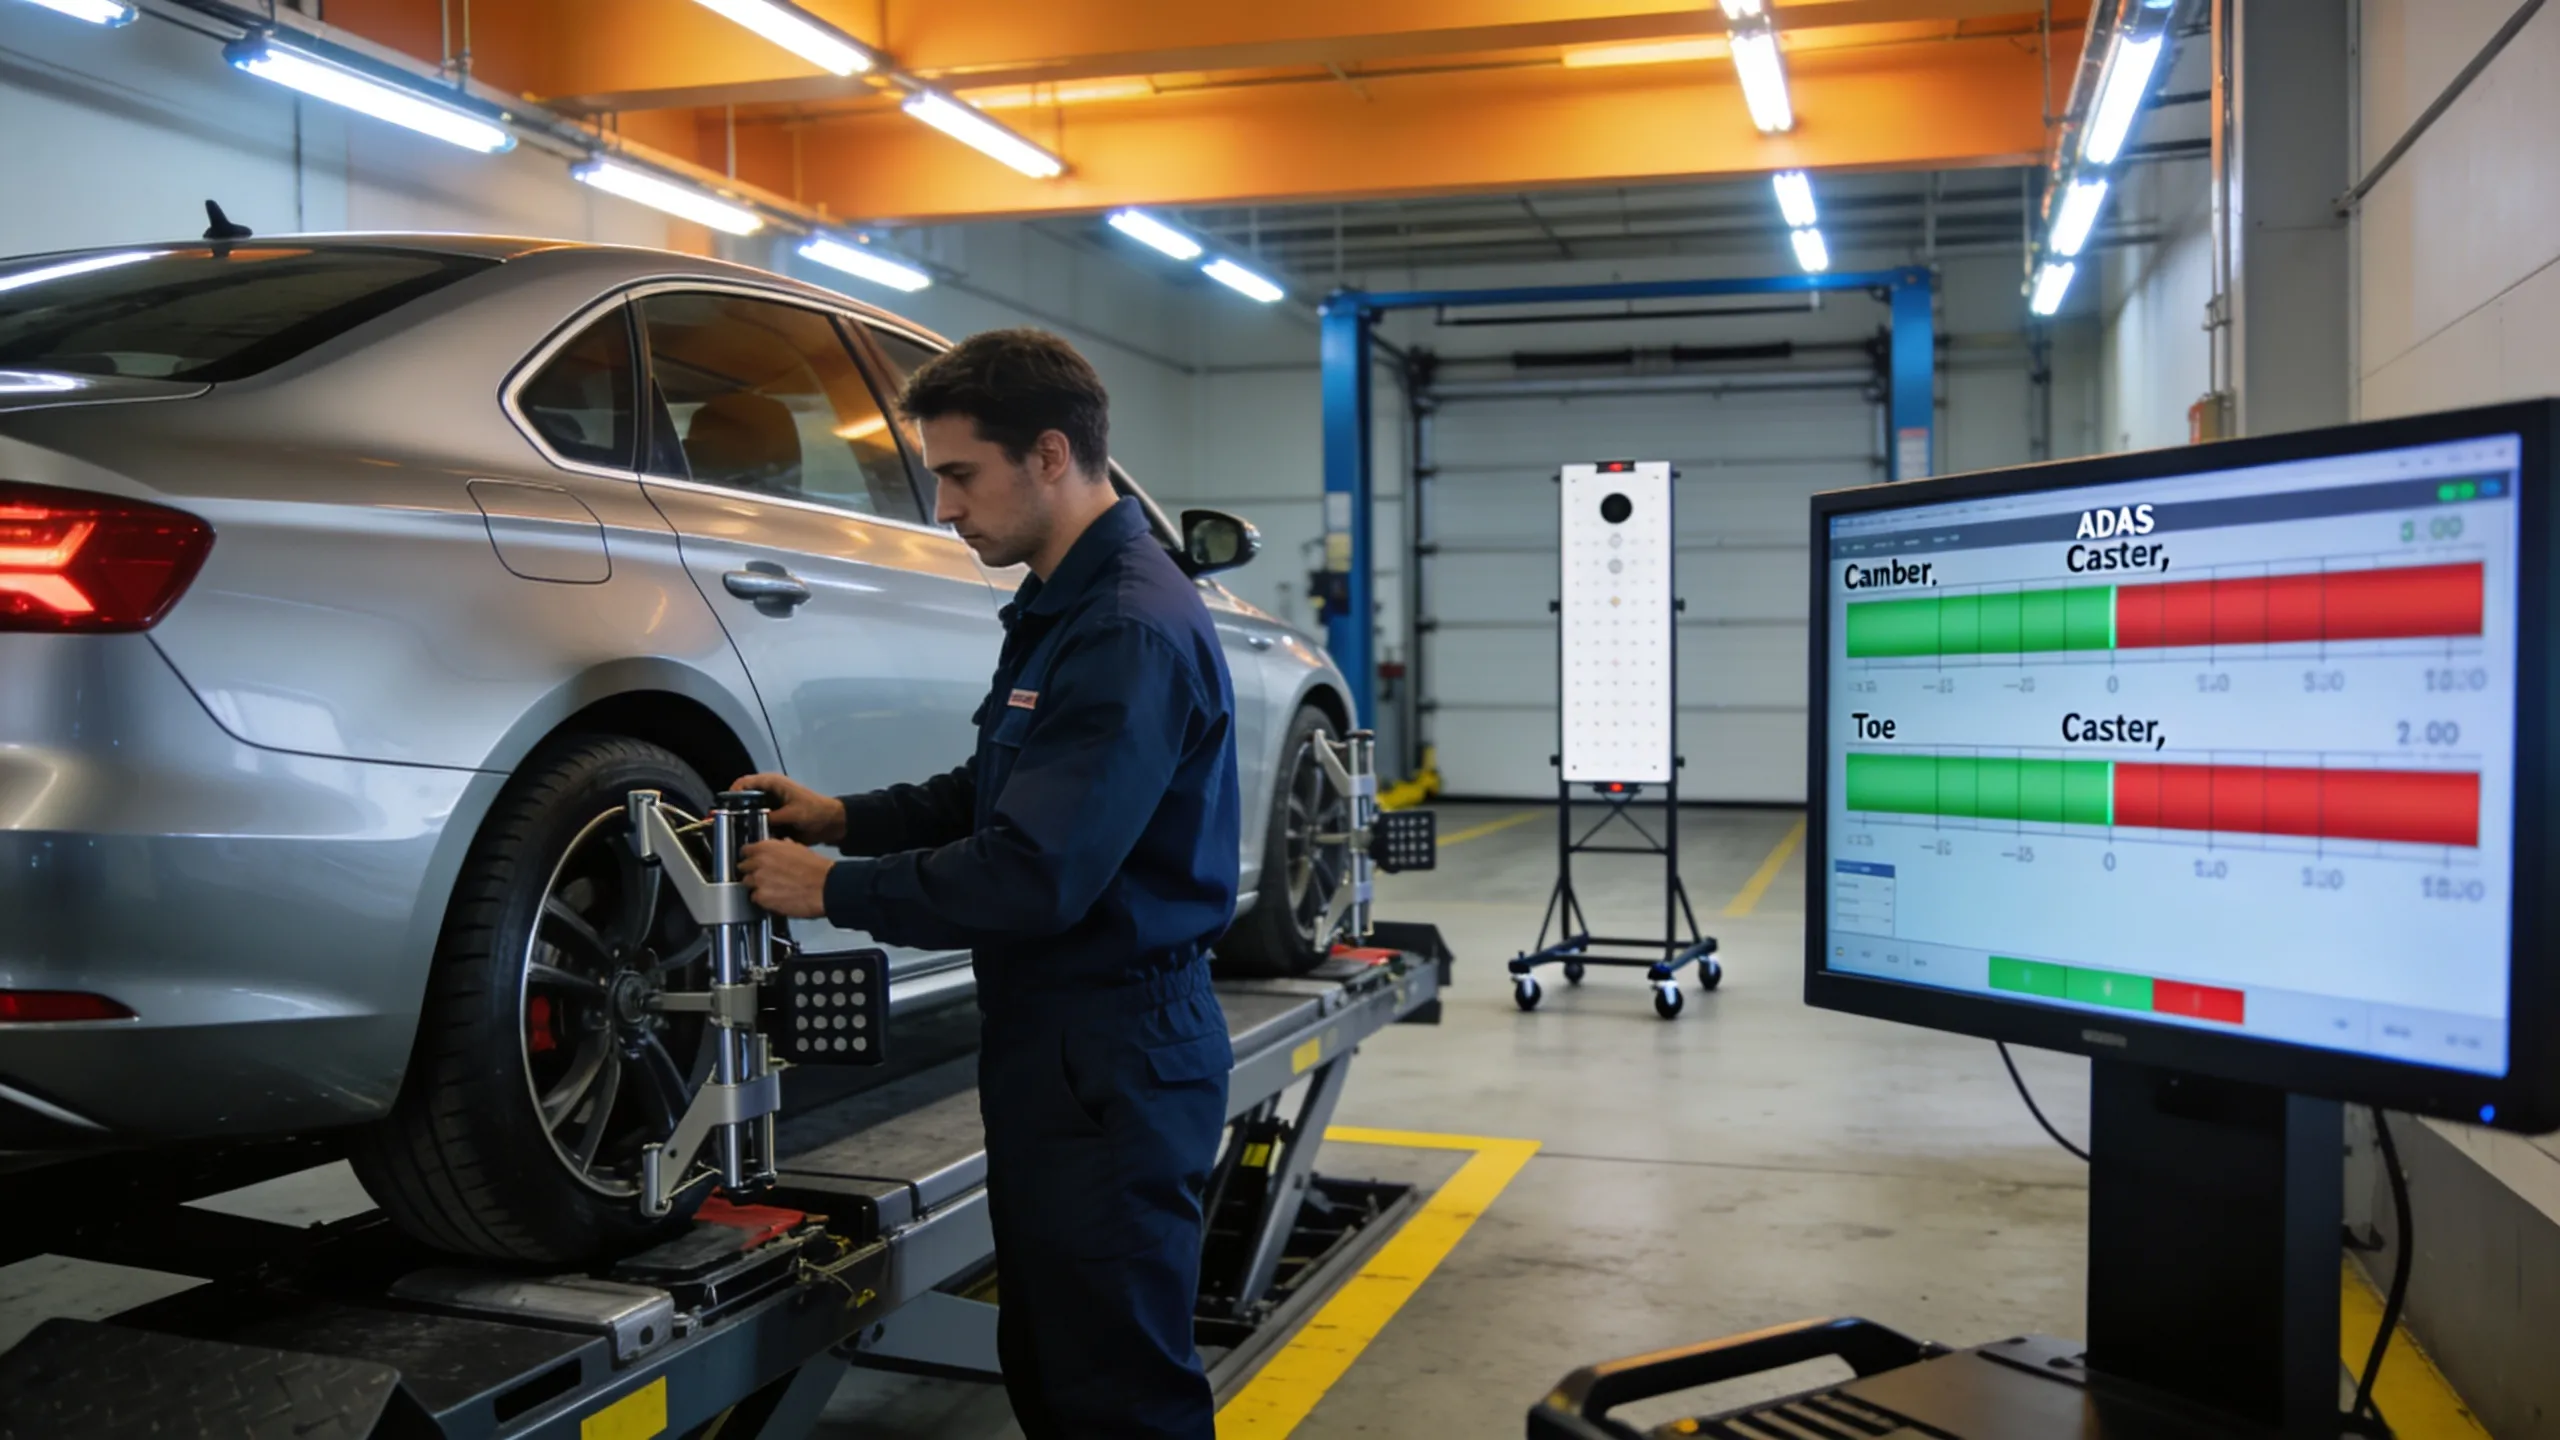
How Static ADAS Calibration Works
Equipment needed in a controlled environment
Static calibration is done in an indoor bay where light, floor level, and spacing can be controlled. Technicians position the vehicle on a level surface, verify tire pressure, confirm ride height, and check alignment values before calibration begins. Then they place manufacturer-specified targets at measured distances from the vehicle centerline. It's more prep work than most car owners expect.
Common static setup tools include:
- Calibration frame or stand system
- Printed or OEM target boards
- Laser alignment tools or digital measuring tools
- Scan tool software linked to vehicle ADAS modules
- Wheel clamps and centerline measurement tools
Even small setup errors can affect results. A target that is 10 millimeters off center can create measurable aiming error in a front camera system.
Precision target alignment step by step
Static calibration usually follows a strict order:
- Pre-scan and fault code check.
- Mechanical checks, including alignment and suspension condition.
- Vehicle centering in the bay and target placement.
- Scan tool initiates calibration mode for each ADAS module.
- Module confirms completion or flags a failed condition.
- Post-scan and documentation.
And sometimes the process fails on the first attempt. Causes include low battery voltage, uneven floor slope, damaged mounting brackets, or incorrect ride height after repair. A shop that doesn't disclose first-attempt failures may be cutting corners on documentation.
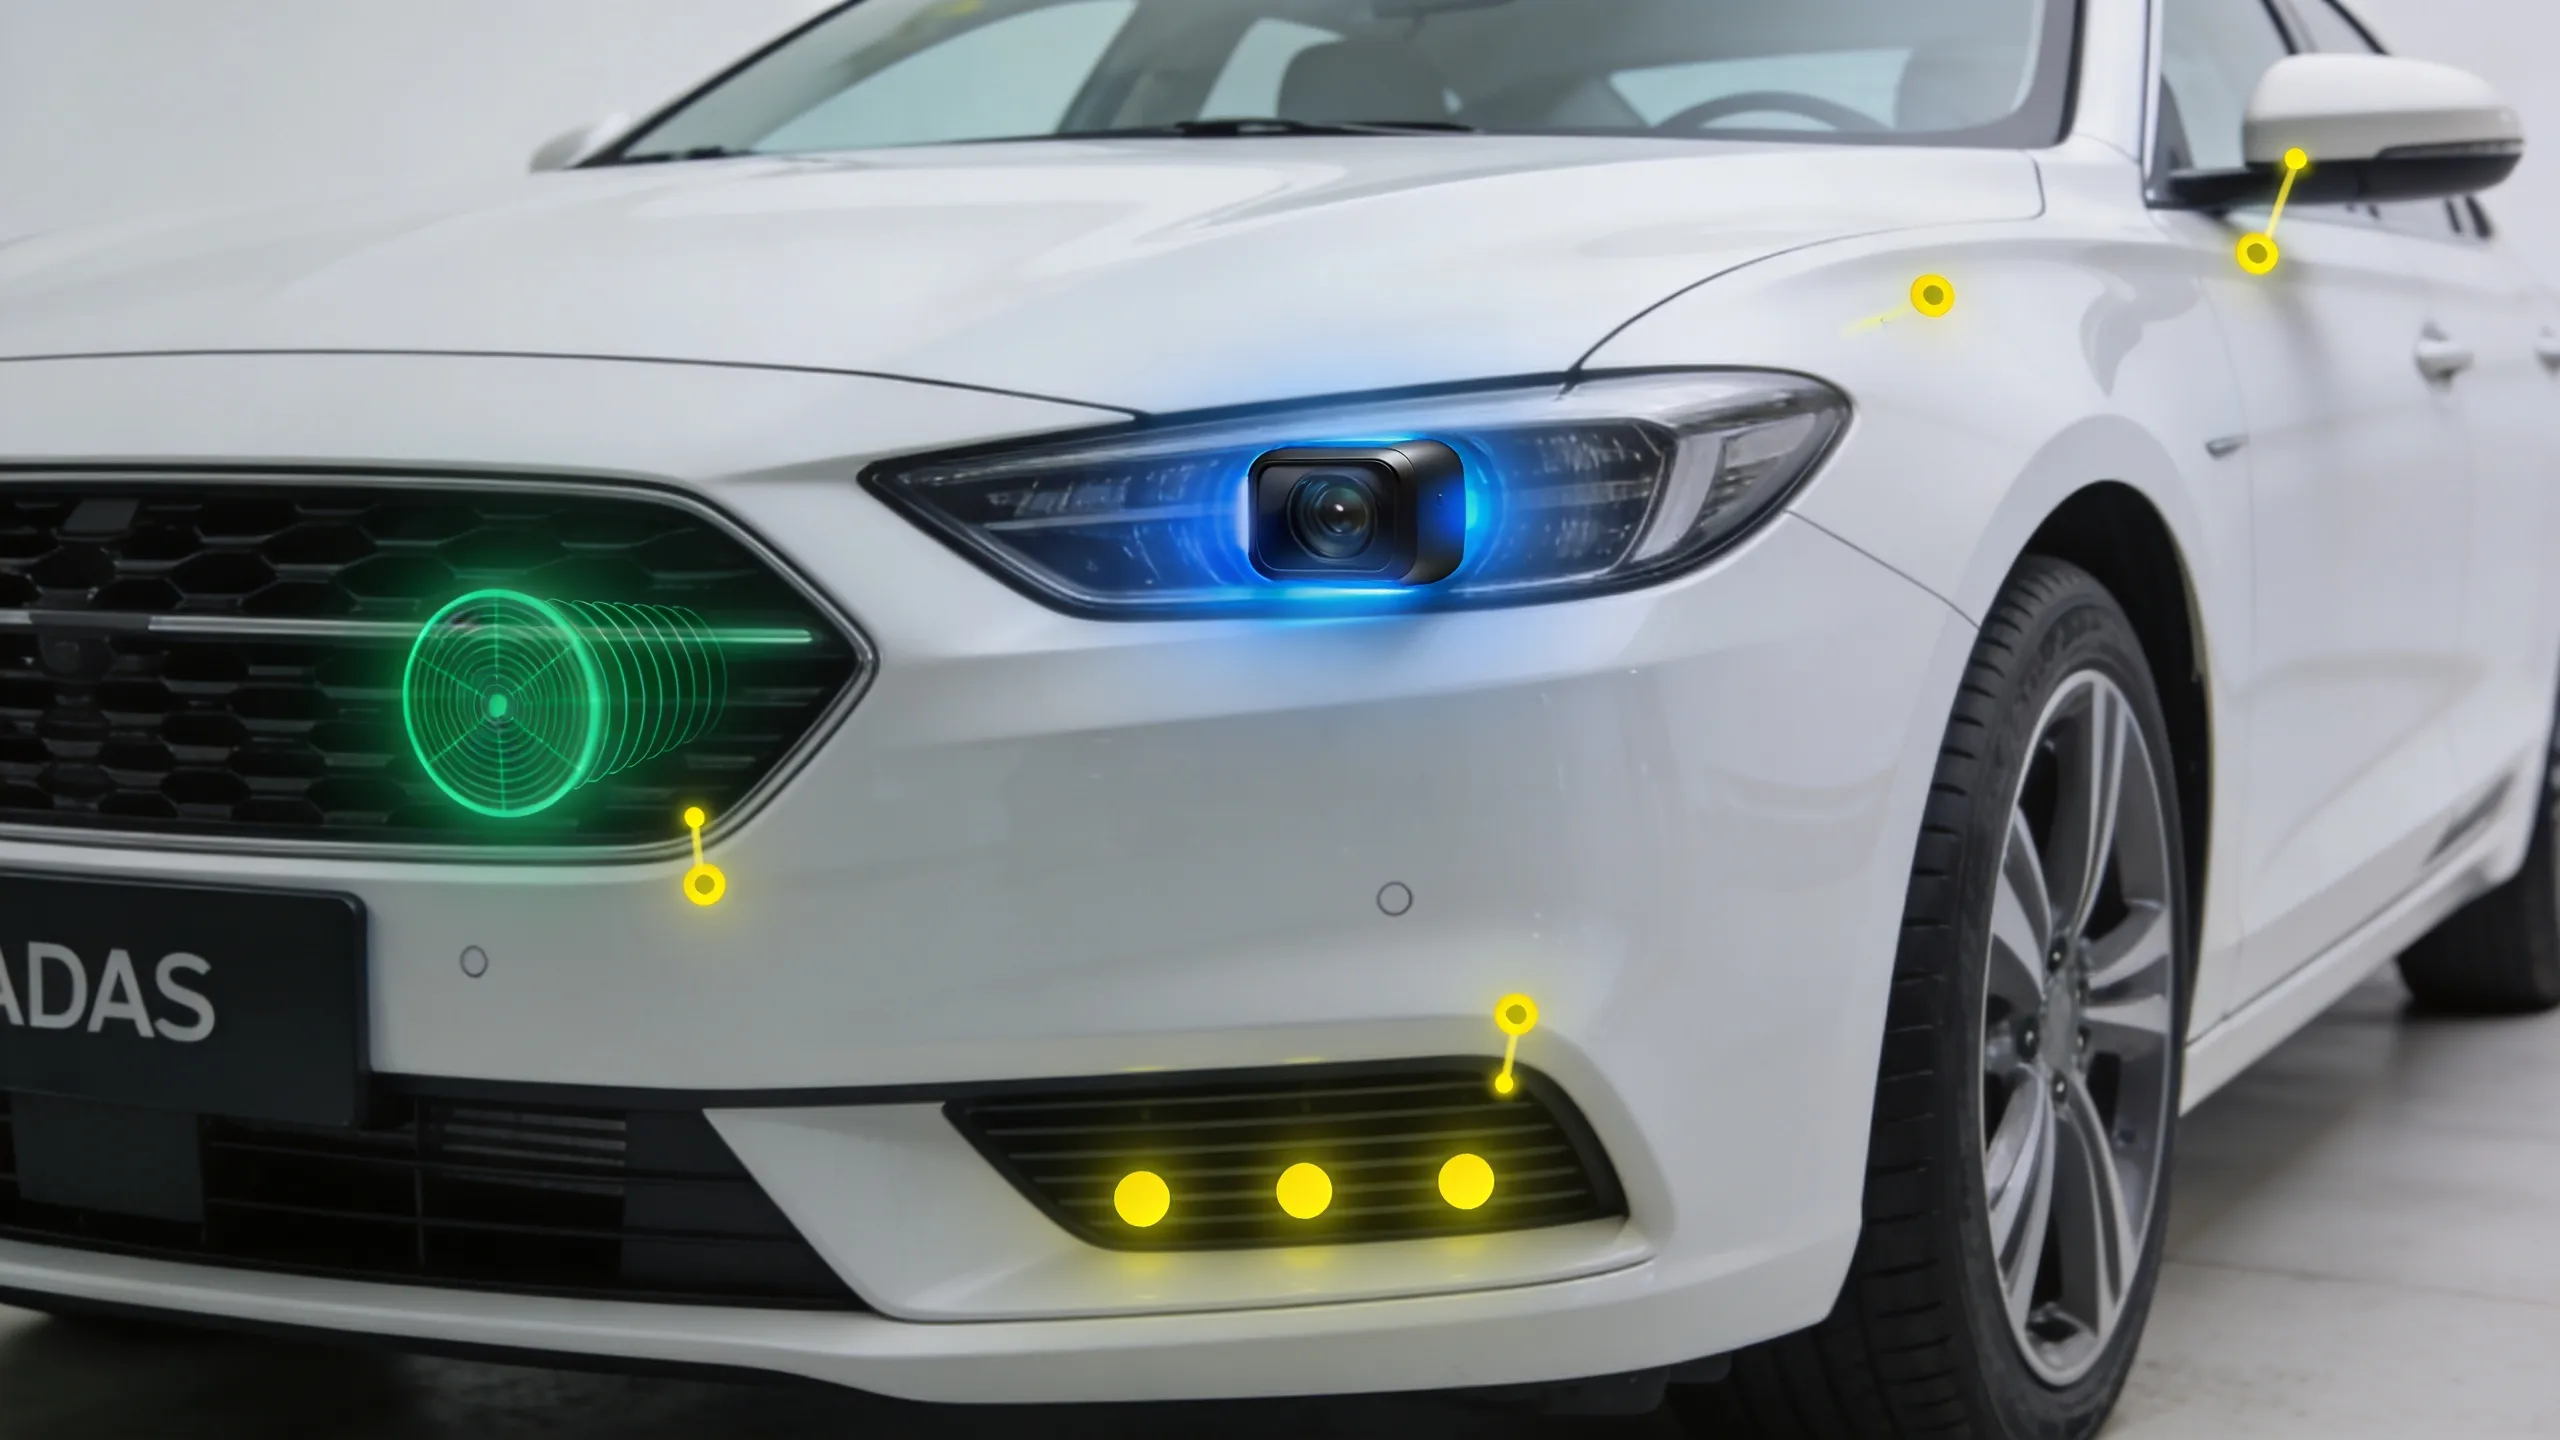
Typical sensors calibrated with static methods
Static methods are common for forward-facing cameras, some radar units, and around-view camera systems. Vehicles with lane departure warning, lane centering, traffic sign recognition, and automatic high beam control often use static procedures for camera aiming.
Sensor combinations vary by model year. For a breakdown of what each sensor does, car owners can review ADAS sensors explained. Not every sensor in a vehicle needs calibration after every repair, but the shop should verify which ones do using the actual OEM procedure for that VIN.
I-CAR provides repair-focused background on why OEM procedures and setup precision are required: I-CAR ADAS resources.

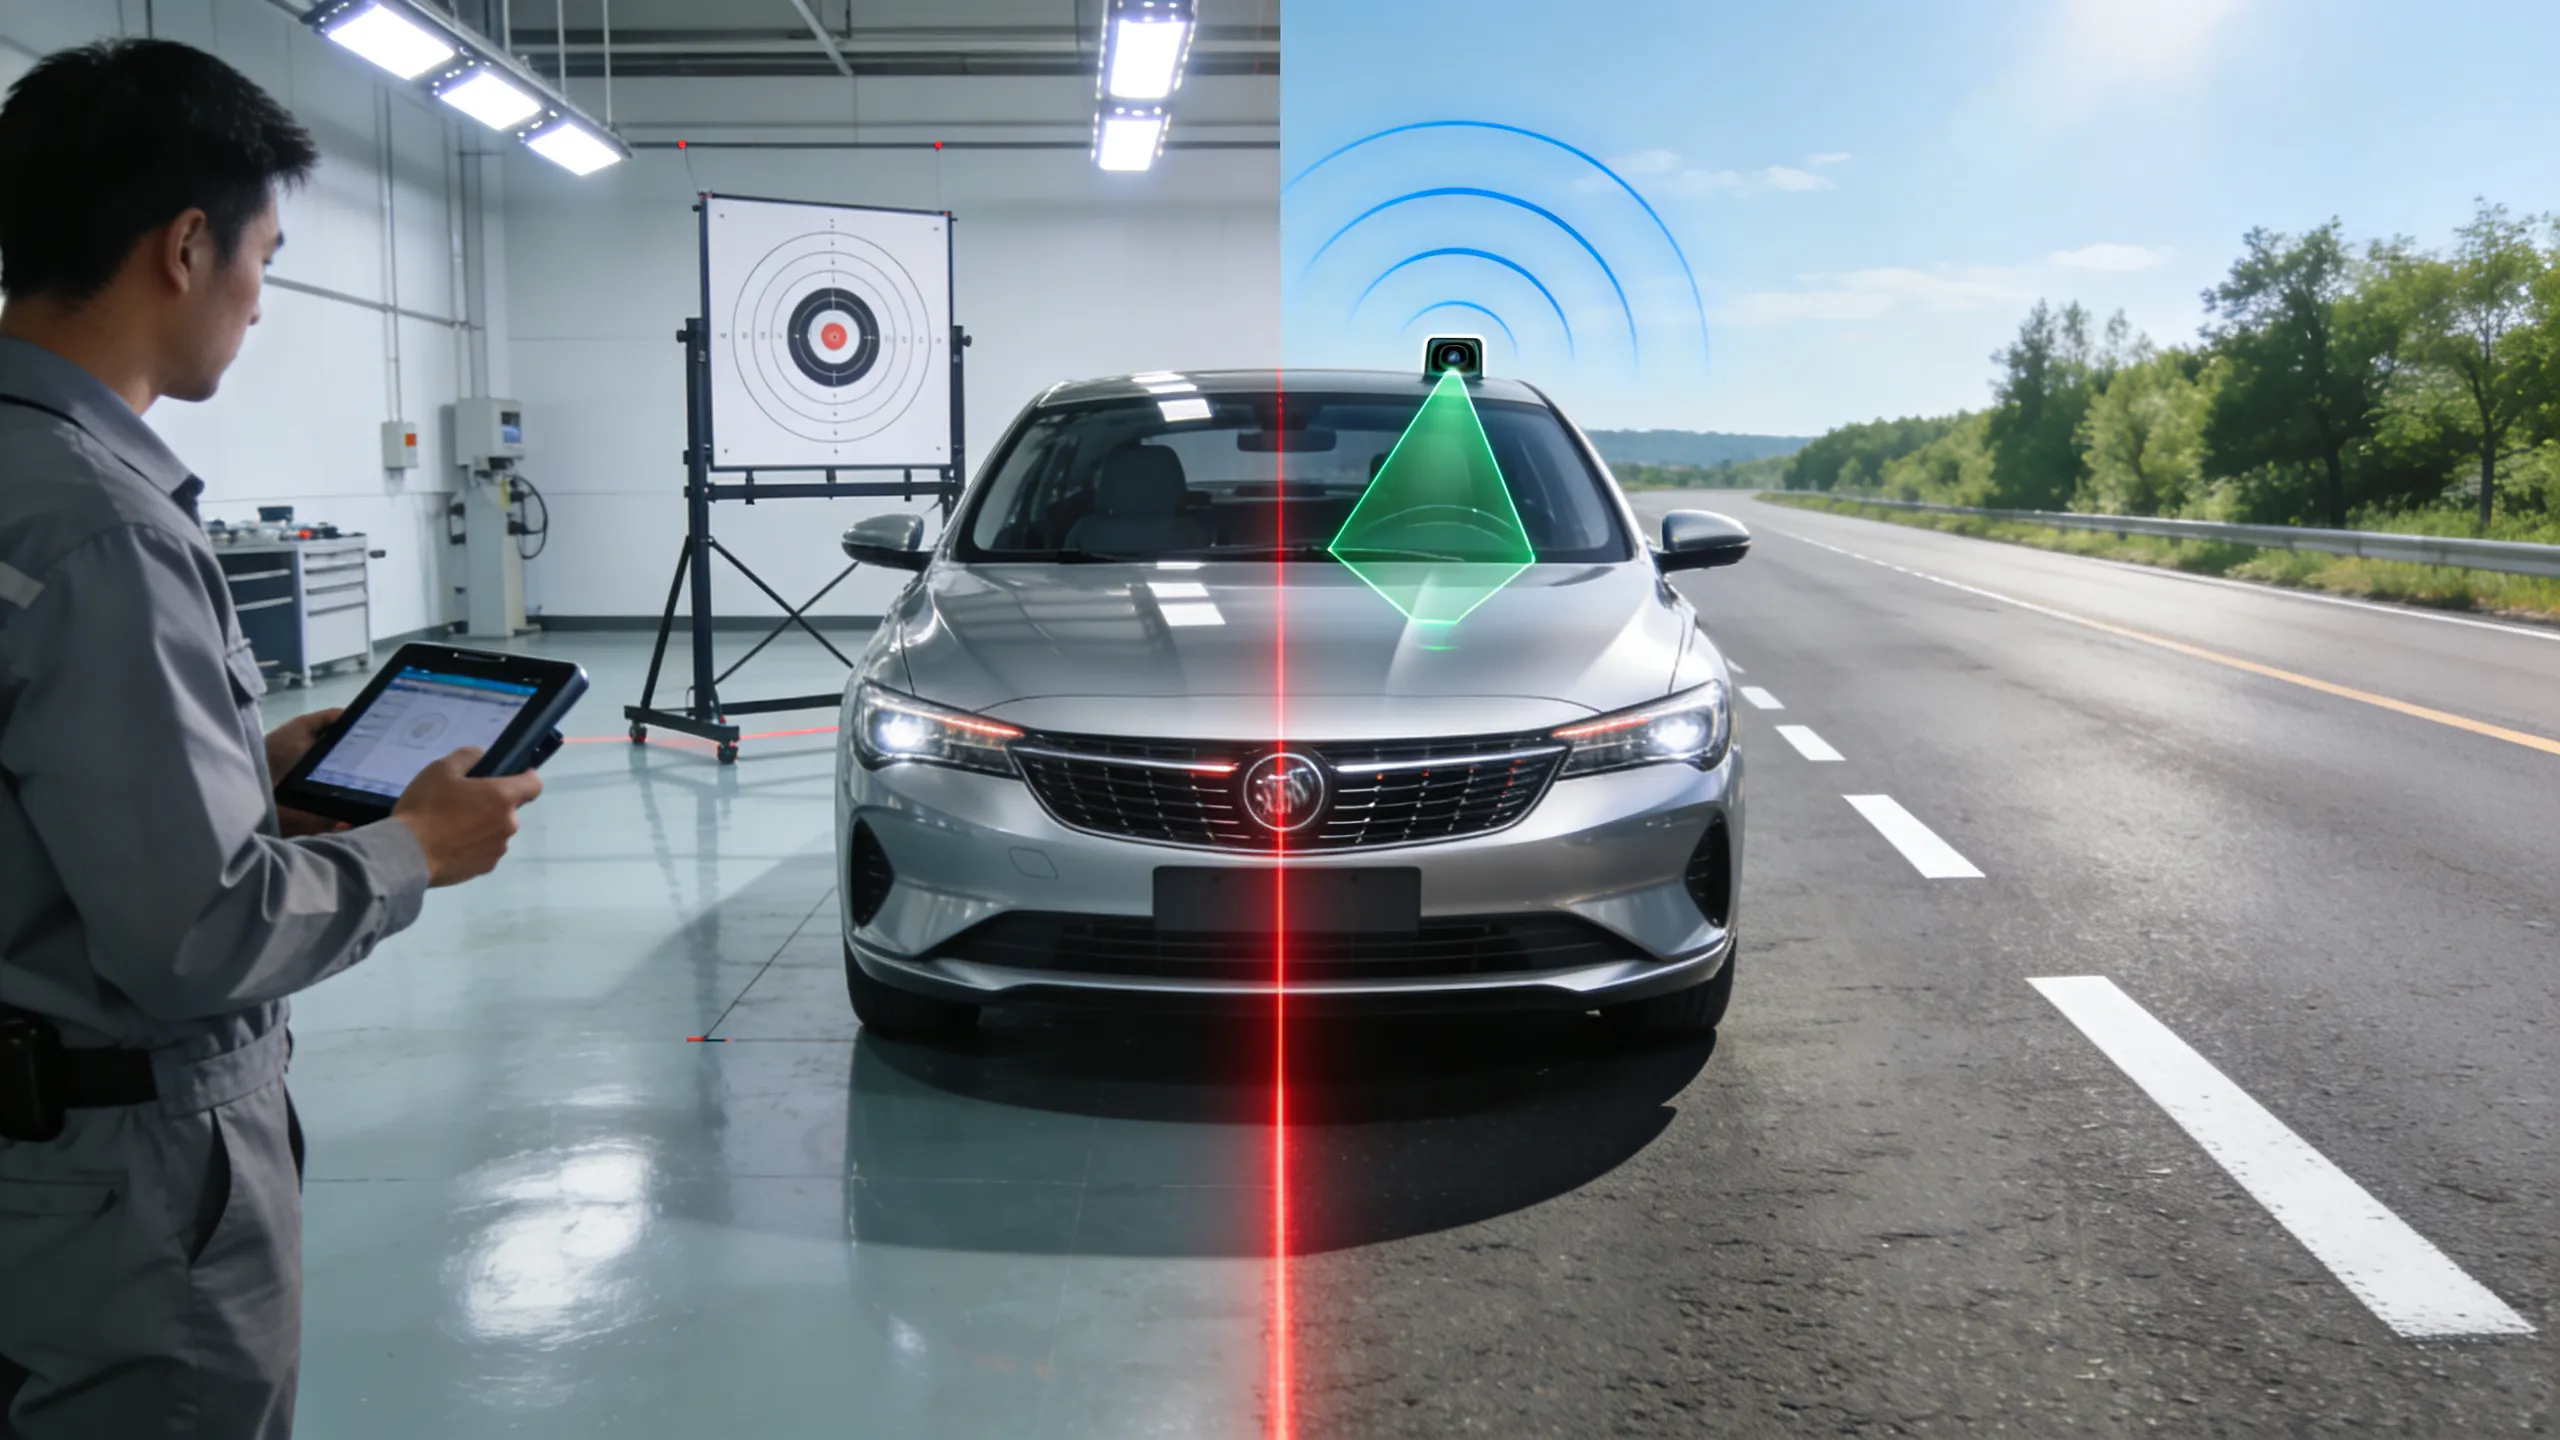
How Dynamic ADAS Calibration Works
Test drive requirements and scan tool setup
Dynamic calibration is done while driving. The technician starts a calibration routine with a scan tool, then drives under specific conditions so the sensor system can learn and confirm its reference points. Some routines complete in 10 miles. Others need 20 miles or more.
Most OEM procedures specify:
- Minimum and maximum speed windows
- Clear lane markings
- Low to moderate traffic
- Dry weather and good visibility
- No active fault codes in related modules
Road and weather can delay completion. If lane lines are faded or rain blocks camera visibility, the process may abort and require another drive cycle. That's not a failure of the shop; it's just how the system works.
Real-world sensor alignment behavior
During dynamic calibration, the system compares sensor input to known road features. A forward camera reads lane boundaries and objects. Radar and camera data may be fused in a central module. The software then adjusts internal offsets so detected objects line up with expected positions.
This is one reason dynamic methods are valuable: the vehicle confirms operation in real traffic geometry, not only in a controlled bay. Dynamic calibration isn’t automatically “better.” It’s just different, and often it works alongside static calibration rather than replacing it.
Systems commonly calibrated dynamically
Dynamic routines are often used for forward camera systems tied to lane features and adaptive cruise functions that rely on road context. Some brands require a static setup first, then a dynamic verification drive. Others allow dynamic-only for selected modules.
The Insurance Institute for Highway Safety (IIHS) publishes consumer-facing information on ADAS performance differences, which helps explain why precise setup and validation matter: IIHS: Advanced Driver Assistance.
When Each Type of ADAS Calibration Is Required
Vehicle-specific rules from OEM procedures
There’s no universal rule for static calibration vs dynamic calibration. Requirements come from the automaker’s service information by make, model, year, and option package. Two trim levels of the same model can have different requirements if one has a different camera or radar supplier.
Guesses are risky. The right method should always be matched to OEM procedure documents, not general shop habits. If a technician can’t name which OEM procedure was used, that’s worth following up on.
Repair events that usually trigger calibration
Calibration is commonly required after:
- Windshield replacement (especially for vehicles with camera mounts on the glass)
- Front or rear bumper removal and replacement
- Collision repair near sensor mounting areas
- Suspension repairs that change ride height
- Wheel alignment adjustments
- Radar sensor replacement or bracket replacement
- ECU/module software updates for ADAS systems
And sometimes no parts were replaced at all. A minor impact can shift a bracket enough to require recalibration.
Signs the wrong method may have been skipped
Possible warning signs include ADAS warning lights, unavailable lane assist messages, false collision alerts, or sudden deactivation of adaptive cruise control. These symptoms don’t always mean calibration was missed, but they should trigger a post-repair check right away. Don’t ignore a warning light that appears within days of a repair.
Vehicles That Need Both Static and Dynamic Calibration
Many late-model vehicles require both methods for complete ADAS function. A common sequence is static camera aim in the bay, followed by a dynamic road verification. This dual process is common on vehicles with camera-radar fusion, where one module needs a controlled baseline and the other needs real-road confirmation.
Why both methods are used together
Static calibration sets the baseline geometry. Dynamic calibration validates that geometry under road conditions. If only one step is done where both are required, some functions may remain disabled or operate outside design tolerance. This isn't a minor inconvenience; it's a safety gap.
Common scenarios where both are required
- Windshield replacement on vehicles with lane centering and adaptive cruise
- Front-end collision repair involving camera and radar mounting areas
- Module replacement on integrated ADAS platforms
- OEM procedure calling for “initialization plus learning drive”
For deeper cost context across these scenarios, car owners can compare examples in this ADAS calibration cost guide.
Static vs Dynamic ADAS Calibration Cost Comparison
Costs vary by region, vehicle complexity, and labor rates. The following ranges are common in U.S. markets for 2026. The table also shows the typical setting and time needed for each path.
| Calibration Type | Typical Cost | Time Required | Setting |
|---|---|---|---|
| Static only | $250-$400 | 1-2 hours | Indoor bay |
| Dynamic only | $150-$300 | 30-60 min | Road test |
| Both required | $400-$700 | 2-3 hours | Bay + road |
Why prices differ between shops
Price differences usually come from equipment investment, technician training level, local labor rates, and whether a shop sublets calibration to a specialist. Some invoices bundle pre-scan, alignment checks, and post-scan verification into one line item. Others separate every step. Neither format is inherently better, but a bundled quote makes it harder to verify what was actually done.
A lower quote doesn’t always mean a better value. If required steps are missing, a second calibration later can raise total cost well above the original estimate. Car owners searching for equipped shops can browse by location at /bodyshop-in/{state}/{city} for nearby options.
Time Comparison: How Long Each Takes
Time depends on procedure complexity, vehicle condition, and road environment. In most routine cases, static calibration takes 1-2 hours. Dynamic calibration takes 30-60 minutes. When both are required, total time is often 2-3 hours.
What can extend calibration time
- Need for pre-calibration wheel alignment correction
- Battery voltage support setup and module communication errors
- Poor weather or traffic during dynamic road tests
- Failed first attempt due to target placement tolerance issues
- Additional modules requiring separate calibration routines
Sometimes vehicles are ready quickly. Other times they aren’t. Same-day turnaround is common, but it shouldn’t be promised before mechanical checks are complete.
Why rushed calibration increases risk
Skipping setup checks to save 20 minutes can create hours of rework later. More important, it can leave safety systems unreliable. Proper calibration needs repeatable setup, complete scans, and documented pass results. Speed and accuracy don't mix well here.
How to Verify Which Calibration Type Was Performed
Documentation car owners should request
After service, car owners should receive paperwork showing what was done. Not every shop provides this automatically, but it's worth asking for. A clear record usually includes:
- Pre-scan and post-scan reports with timestamps
- OEM procedure reference or calibration routine ID
- Pass/fail status for each ADAS module
- If dynamic was performed, notes on drive cycle completion
- Related alignment specs when required by procedure
Paperwork quality varies. If a receipt only says “calibration completed,” that's not enough detail for future warranty or insurance questions.
Post-service questions that reveal missing steps
Simple questions can clarify whether the right process was followed:
- Which ADAS modules were calibrated by name?
- Was the method static, dynamic, or both?
- Which OEM procedure was used for this exact VIN?
- Did any step fail and require a repeat?
- Were there road-test limitations due to weather or traffic?
If answers are vague, a second review is reasonable. ADAS systems are safety-critical, and complete records protect everyone involved. A reputable shop won't hesitate to explain what was done.
Related reading for ongoing ADAS awareness
AAA has published research showing that advanced safety features can reduce crashes but also perform inconsistently in some scenarios, which reinforces the need for proper setup and maintenance: AAA ADAS research updates.
Static vs Dynamic ADAS Calibration: What Car Owners Should Take Away
Understanding static vs dynamic ADAS calibration helps car owners evaluate estimates, ask better questions, and confirm that required steps were completed after repair. Static procedures use controlled indoor targets. Dynamic procedures use real-road learning conditions. Many vehicles need both, and skipping one where it’s required isn’t a shortcut — it’s a liability.
The goal isn’t to pick the cheaper method. It’s to match the right method to the exact vehicle and repair event. When documentation is complete and OEM procedures are followed, ADAS features are far more likely to perform as designed when they’re needed most.
For next steps, start with the ADAS calibration pillar guide, then review how ADAS calibration works at a high level and what calibration usually costs by service type. To find a shop equipped for both static and dynamic procedures, search by location at /bodyshop-in/{state}/{city}.